A note on this document
Lens is still under active development. Screens, wording, and even some steps in this manual may change as the app improves — this manual will be updated to keep pace. If something on your screen looks slightly different from a screenshot here, don't worry: the overall steps and logic will almost always be the same.
This manual is written for two audiences: field enumerators who collect data using the Lens app on a phone or tablet, and administrators who manage forms, review data, and monitor fieldwork through the Lens admin console on a computer. It uses the real JigawaUNITE Midline Evaluation form as its working example throughout, but everything described applies to any form built on the Lens platform.
Watch: a complete video walkthrough
Prefer to watch rather than read? This eleven-minute, narrated video covers everything below in one sitting: signing into the admin console, building a brand-new form question by question in the Form Builder — every question type, plus hints, validation rules, choice randomization, skip logic, and a real random-assignment pattern — saving it live, then switching to the enumerator app to answer every question and submit a real response.
The Enumerator App
Used out in the field, on a phone or tablet, to record a pupil's answers. It works fully offline — everything is saved on the device first, and sent to the server automatically once you're back online.
1. Signing in
Open the enumerator app at surveyplatform.newglobedata.education on your phone or tablet's browser. You'll see the sign-in screen below. Enter the username and password you were given, then tap Sign In.
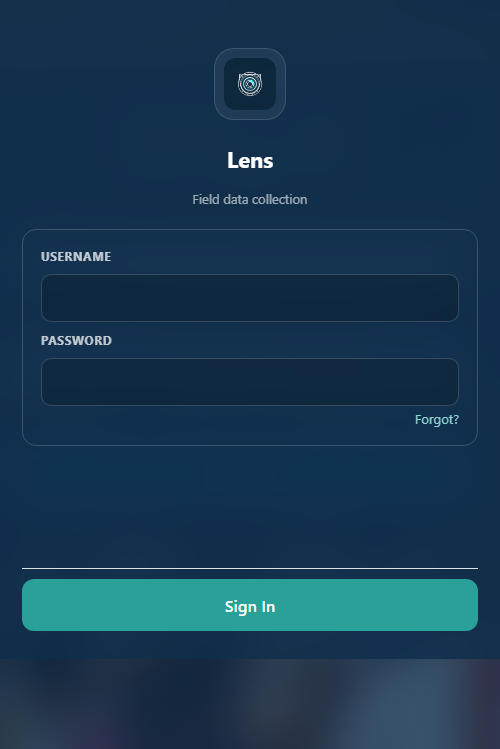
- One shared login per device. Most field tablets use one shared username and password that every enumerator using that device signs in with — your admin will tell you what it is.
- You only need to sign in once. The app remembers you until you deliberately tap Sign Out.
- No internet? No problem. Once signed in the first time, you can keep collecting data fully offline — you only need a connection again when you're ready to send finished responses.
Installing the Android app (APK)
Lens is also available as a downloadable Android app, for devices that prefer a proper installed app over opening a browser address:
Download the Lens app (.apk, ~2 MB)
- Google Drive will first show a page saying it “can't scan this file for viruses” — this is Drive's standard warning for app files, not a sign of a problem. Tap Download anyway to continue.
- Since this app isn't distributed through the Google Play Store, Android will ask you to allow “install from unknown sources” the first time — this is expected and safe for an internal field-data tool distributed directly by your project.
- Open the downloaded file from your phone's Downloads/notifications to install it, exactly like installing any other Android app.
- The installed app opens the same live Lens site described throughout this manual — every screen and step below works identically whether you're in the installed app or a plain browser tab.
Prefer not to install anything? You don't have to — opening surveyplatform.newglobedata.education directly in your phone's browser works exactly the same way, including offline. iPhone/iPad users (no APK support on iOS) should use this browser route, and can optionally add a home-screen shortcut for a more app-like feel: open the site in Safari, tap the Share icon, then tap “Add to Home Screen”.
2. The Home screen
Your starting point for everything: start a brand-new response, resume a paused one, see what's waiting to send, and see what's already been sent.
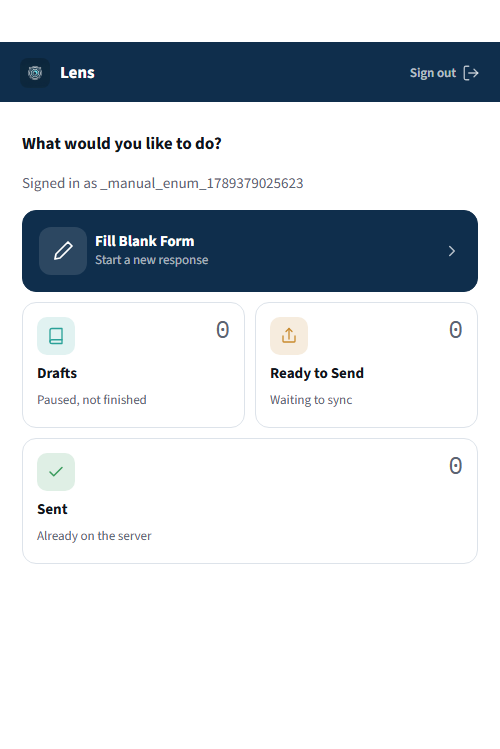
- Fill Blank Form — starts a brand-new response from question one. What you'll use most often.
- Drafts — responses you started and paused (for example, after tapping Save & Exit). The number shown is how many are waiting.
- Ready to Send — finished responses that haven't reached the server yet because you were offline. These send automatically once connected.
- Sent — a personal log of responses this device has already delivered. Your data is already safe even if you never check this list.
3. Starting a new response
Tap Fill Blank Form to see the list of forms you have access to. In this example, only one form is assigned to this login.
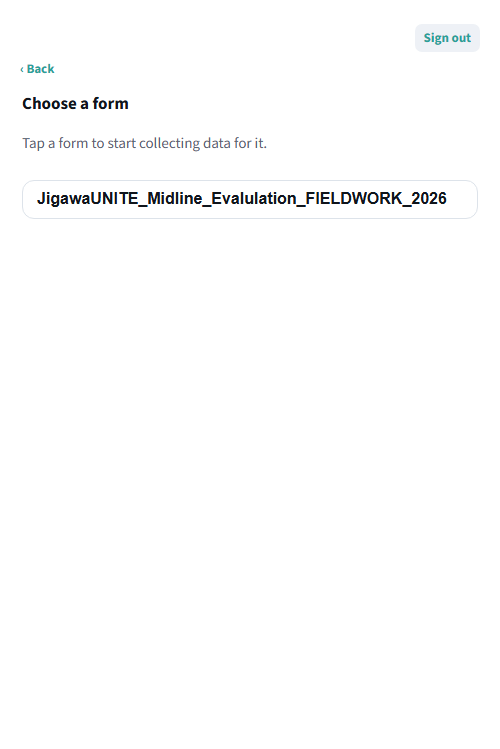
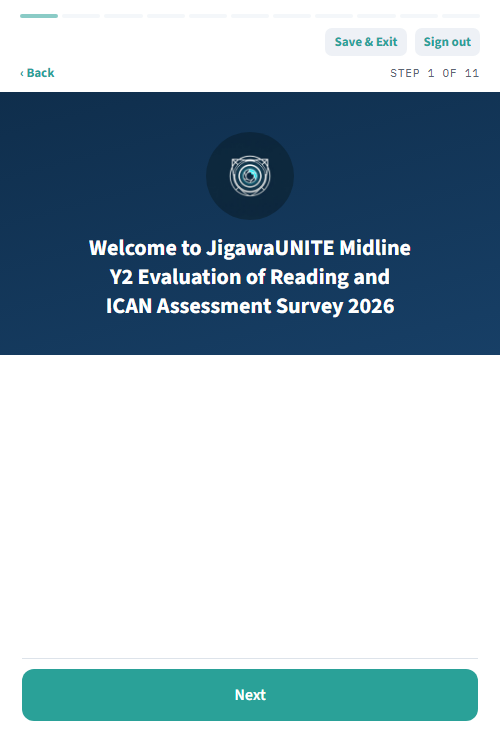
Tap the form's name to begin. A short welcome screen describes the survey before the real questions start.
4. Basic questions: names, places, dates
Most questions are simple: tap one option, or pick a name from a dropdown. A thin progress bar always shows how far through the form you are, and “STEP X of Y” in the corner tells you exactly which question you're on.
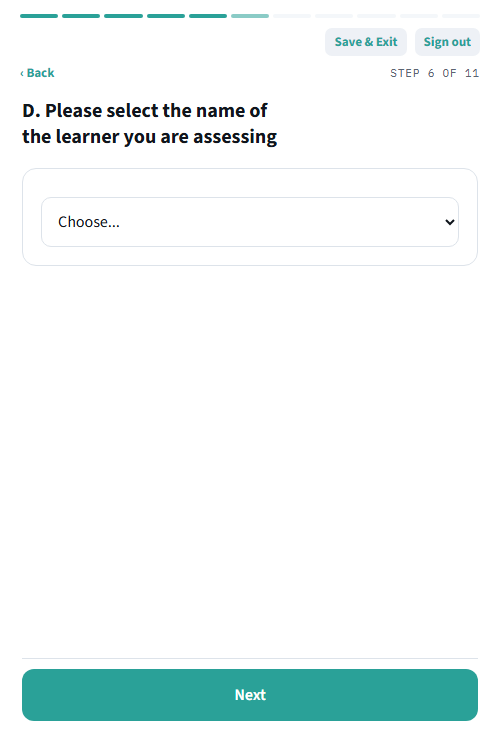
After picking your name as the Assessor and the LGA and School you're working in, you're asked which pupil you're assessing — already pre-loaded from the school's real roster.
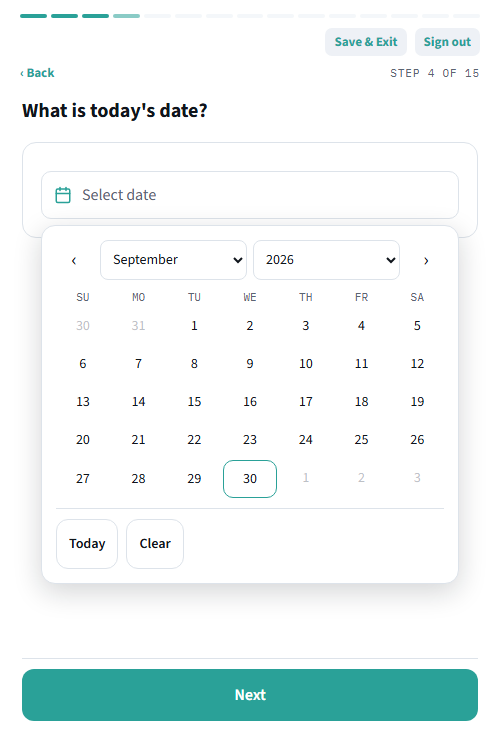
Right after this, some forms ask for a date. A plain date question opens Lens's own in-app calendar when you tap it — not your phone's own date picker — so it looks and works identically on every device.
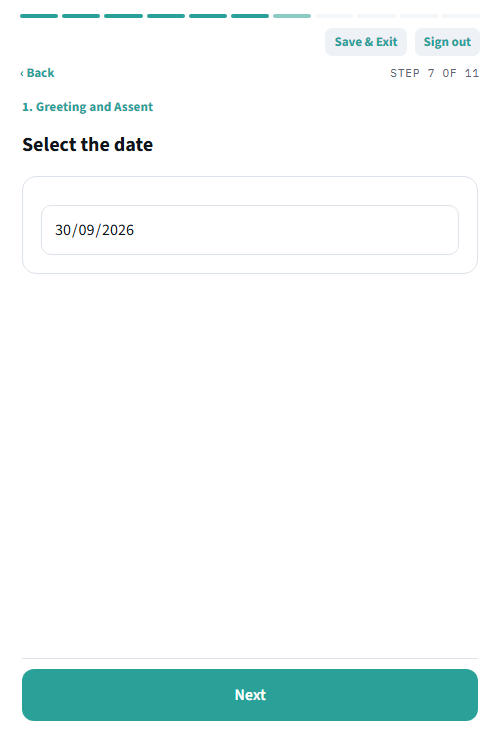
In JigawaUNITE specifically, this step is a locked date: it fills itself in with today's real date automatically and can't be changed, since this particular question always means “the day of this interview,” never a date you need to recall or pick.
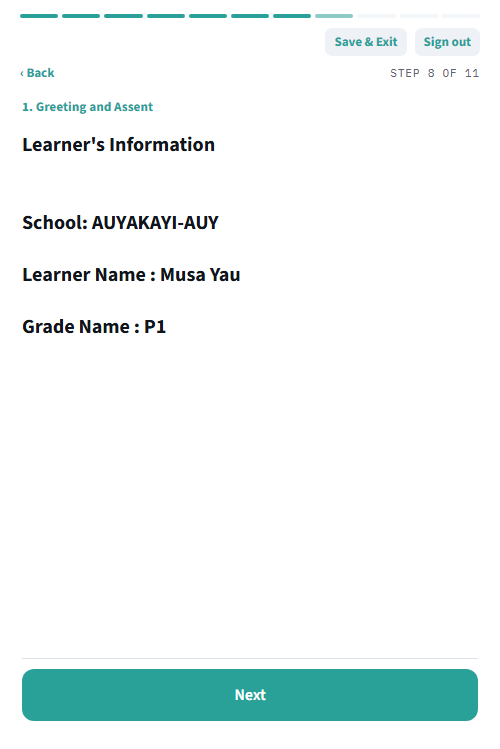
Next, a quick confirmation of the learner's school, name, and grade — a check that you have the right pupil before continuing.
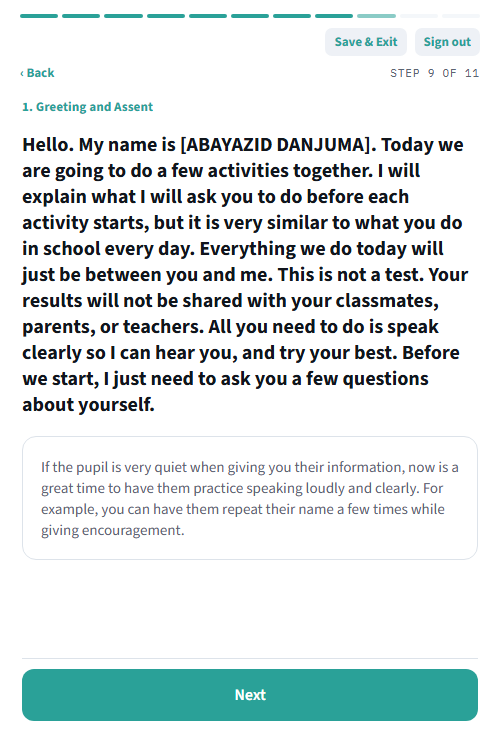
Then a script for you to read aloud, introducing yourself. Anything in square brackets, like [ABAYAZID DANJUMA], is filled in automatically — you read the name, not the brackets.
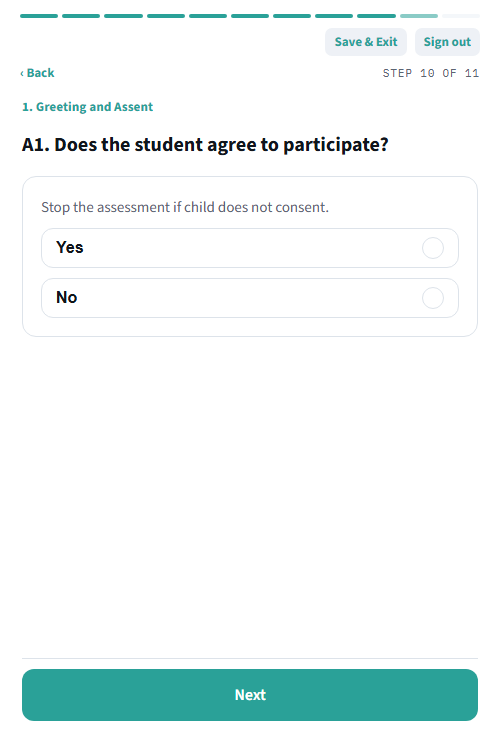
The pupil must agree to take part before anything else happens. If the answer is No, stop the assessment there.
5. The Oral Reading Passage Assessment, step by step
The heart of the reading assessment. The pupil reads a short passage aloud for up to 60 seconds, while you follow along and tap any word they get wrong. The app times it, records the audio, and works out the reading speed automatically.
In JigawaUNITE, every pupil reads two passages: a common baseline passage everyone reads (“Our Pond”), then one matched to their own grade — “Our House” for Grade 1, “The Ant and the Grasshopper” for Grade 2, and so on through Grade 6. The app already knows which one applies, based on the grade entered earlier.
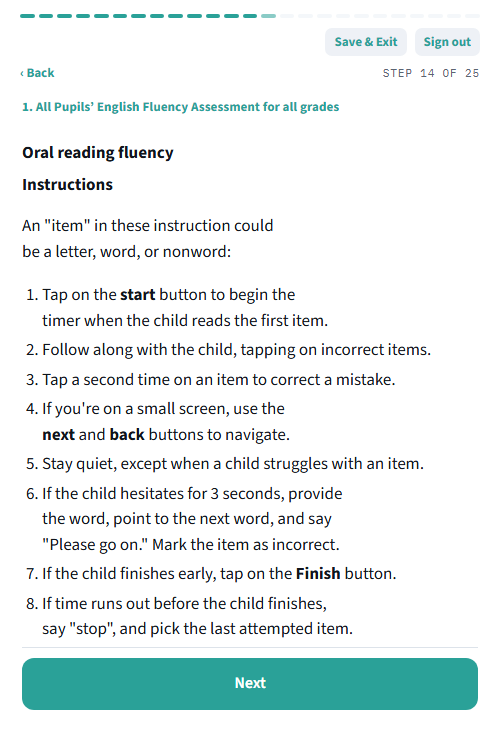
Step 1 — Read the instructions
Before every passage, the app shows a reminder of exactly how to run the timed reading.
Step 2 — Get the right physical passage ready
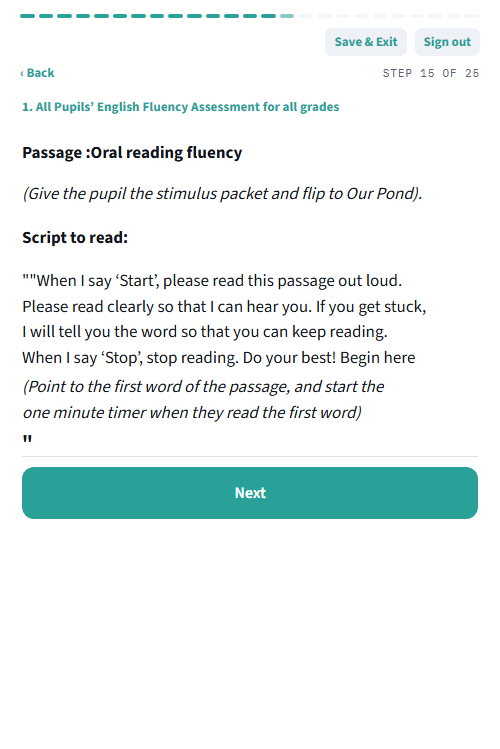
The app tells you exactly which passage to hand the pupil from the printed stimulus booklet, and the exact words to say before starting the timer.
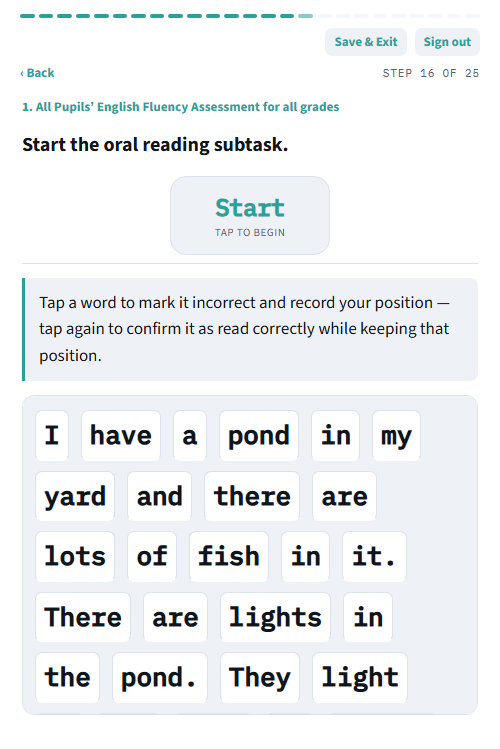
Step 3 — Start the timer
Nothing happens until you tap Start — that's the moment the 60-second countdown, and a hidden audio recording of the pupil reading, both begin.
Step 4 — Follow along and mark mistakes
Tap any word the pupil reads incorrectly, skips, or badly hesitates over. A tapped word turns red with a line through it; tap again to un-mark it.
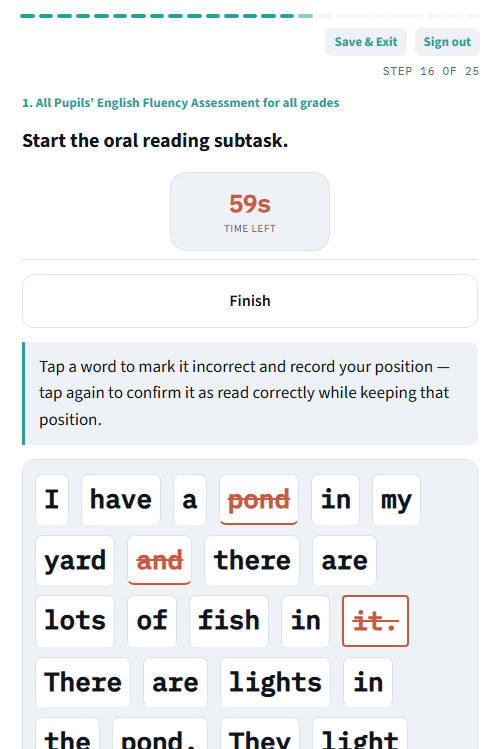
- Stay quiet while they read, except to help when they get badly stuck.
- If the pupil hesitates for about 3 seconds, supply the word, point to the next one, and say “Please go on” — mark that word incorrect.
- If the pupil finishes early, tap Finish right away rather than waiting out the clock.
- If the full 60 seconds runs out first, the app stops automatically.
Step 5 — Finish and confirm the score
The app instantly calculates the score and shows it right on the same screen.
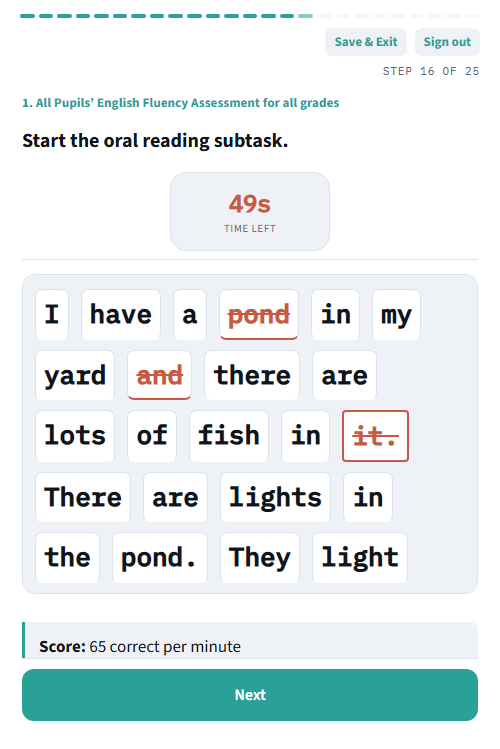
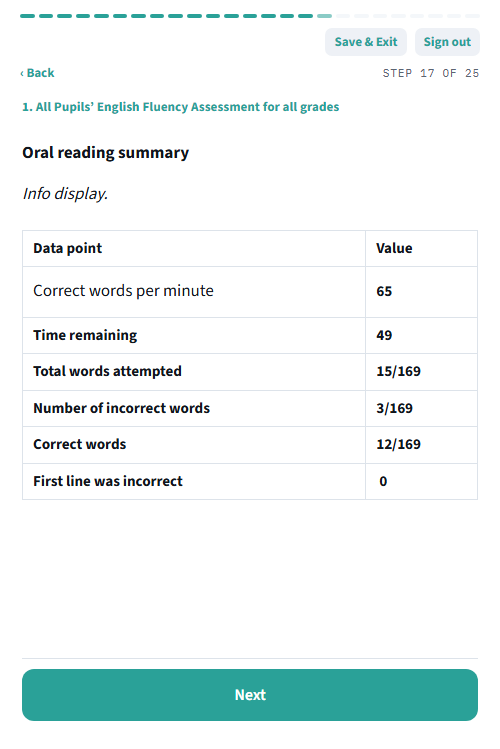
Tapping Next shows a clean summary: words attempted, words correct, and the final score in correct words per minute.
6. The ICAN Numeracy Assessment, step by step
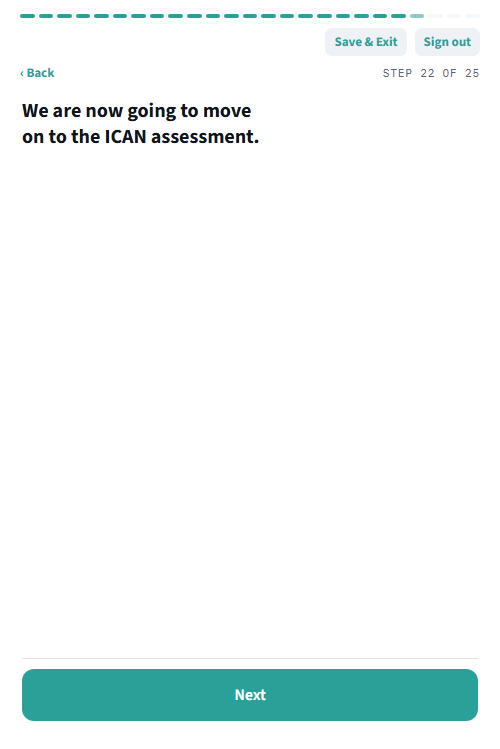
After the reading passages, the form moves into ICAN — a short, spoken numeracy check covering number recognition and basic arithmetic. Like the reading passages, it's read aloud and answered aloud; you record whether each answer was correct.
First, the pupil's preferred language — English or Hausa. Every ICAN question exists in both; the app shows the right version to read.
Number recognition
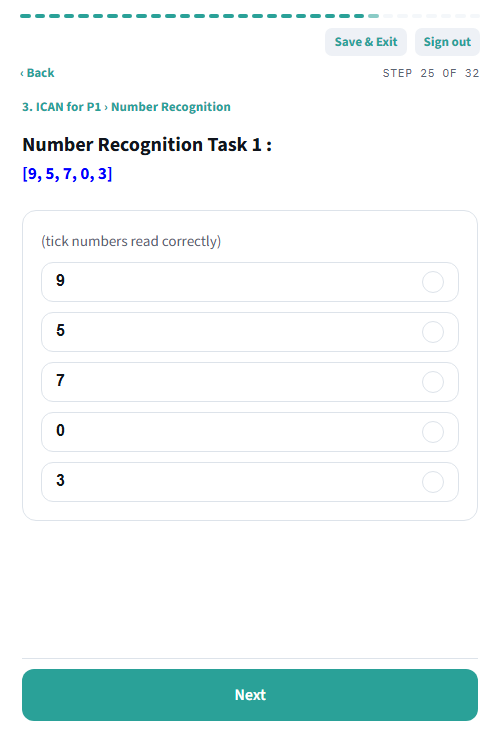
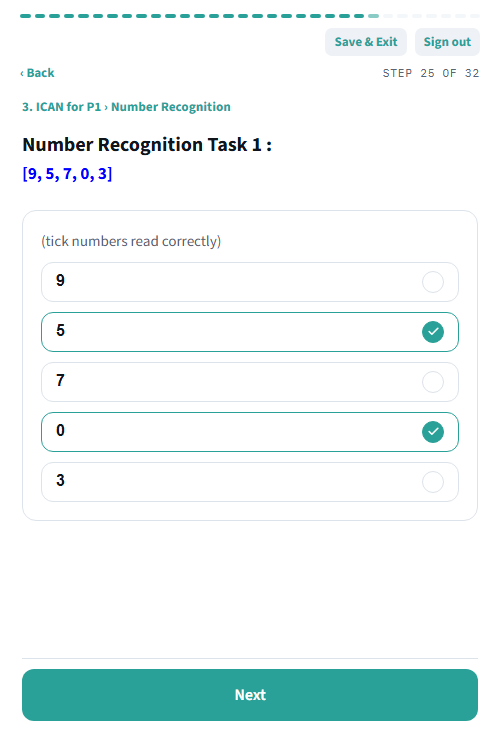
The pupil is shown a row of numbers (from the physical packet) and reads each aloud. You tick off exactly which ones they read correctly — not necessarily in order.
Addition, subtraction, multiplication, division
For each task, the app shows the exact problem to read aloud, with the correct answer already printed in grey for your reference — the pupil never sees this part. You mark whether their spoken answer was Correct or Incorrect.
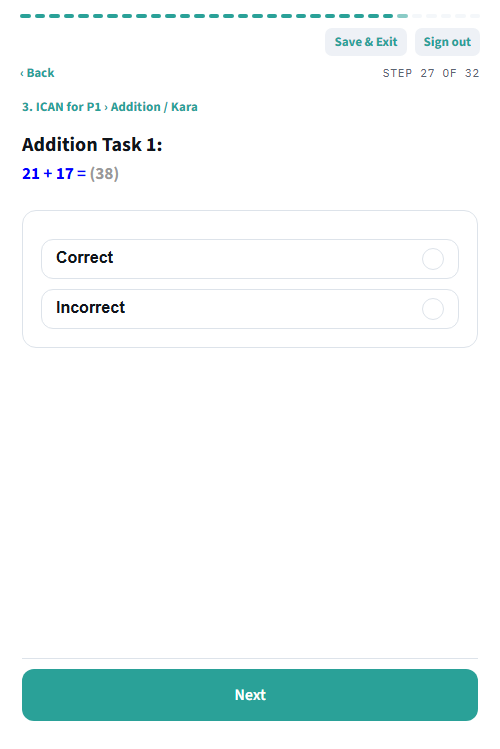
- Read the problem exactly as written, aloud, in whichever language the pupil chose.
- Give them a moment, then compare their spoken answer to the reference shown.
- A few tasks include a short word problem instead of a bare sum — read the whole scenario aloud.
7. Reviewing and submitting a response
Once every question is answered, the Review screen lists every question and its answer, start to finish. Scroll through and check everything looks right.
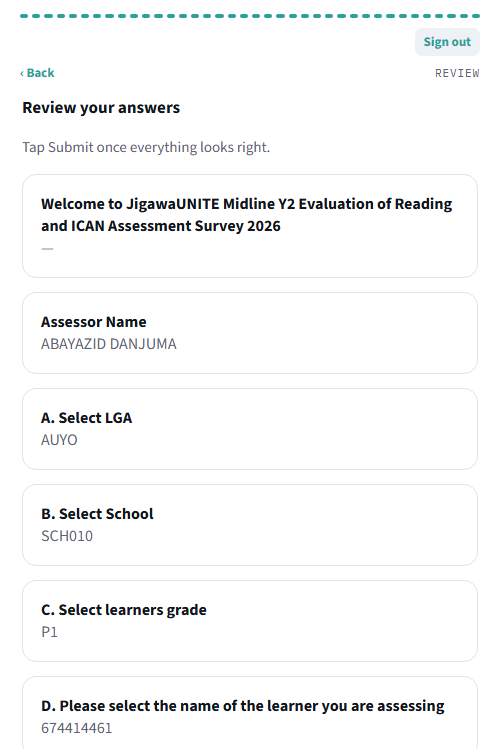
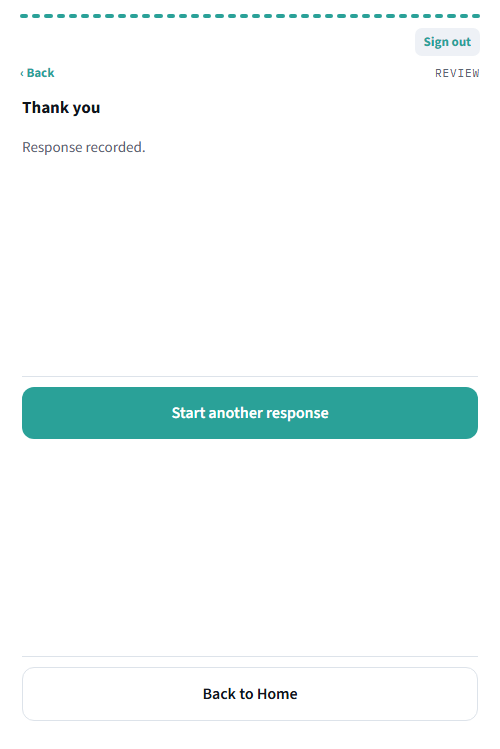
When satisfied, scroll down and tap Submit. If any audio was recorded (the reading passages), it uploads at this point too — you'll see “Submitting… (X of Y recordings sent)”. Stay connected until this finishes.
8. Drafts, Ready to Send, and Sent
- Need to pause partway through? Tap Save & Exit (visible on every question screen). Your progress — including finished reading passages — saves as a Draft, resumable later from Home exactly where you left off.
- Never start fresh over an unfinished response. Always resume a paused interview from Drafts, rather than tapping Fill Blank Form again for the same pupil.
- Ready to Send and Sent are safe to ignore day-to-day. They're there so you can double-check your own work, not because anything requires action.
9. Signing out and staying safe
Sign Out is available from every screen. It clears the device's saved login — the next person needs to sign in again. On a personal device kept for the whole project, you generally don't need to sign out between interviews; on a shared device handed between enumerators, sign out at the end of your shift.
The Admin Console
The web-based control room for the whole project, used from a computer. This is where forms are managed, submitted data is reviewed and exported, and reading assessments get an experimental AI cross-check.
10. Signing in to the admin console
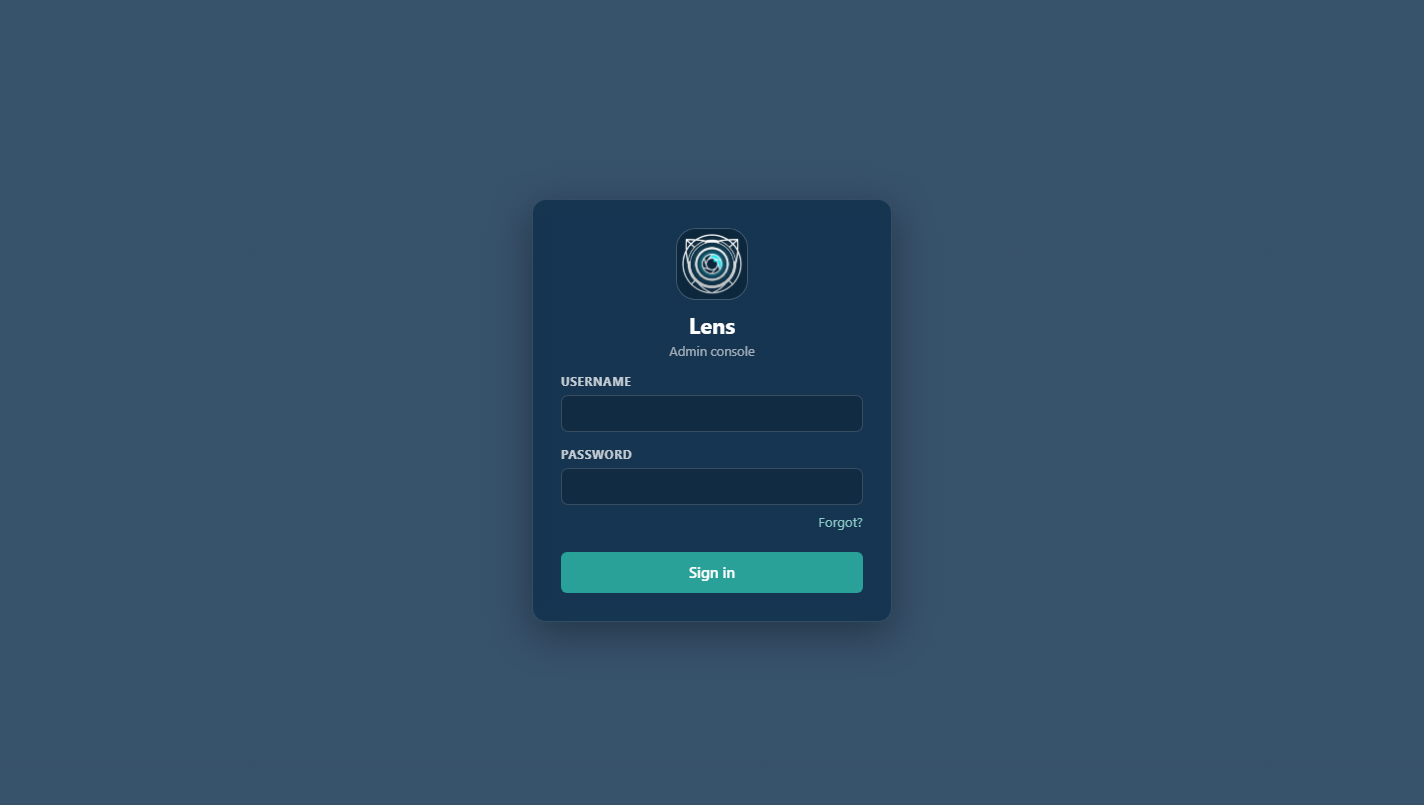
Open the admin console at surveyplatform-admin.newglobedata.education in any browser and sign in with your own admin username and password. Unlike the enumerator app, every admin has an individual account — never a shared login.
11. Dashboard
The first thing you see after signing in, under Project in the left sidebar — a real-time overview of fieldwork progress across every form. Click Project again at any time to come back here, or use the search box that drops down beneath it to jump straight to one specific form by name.
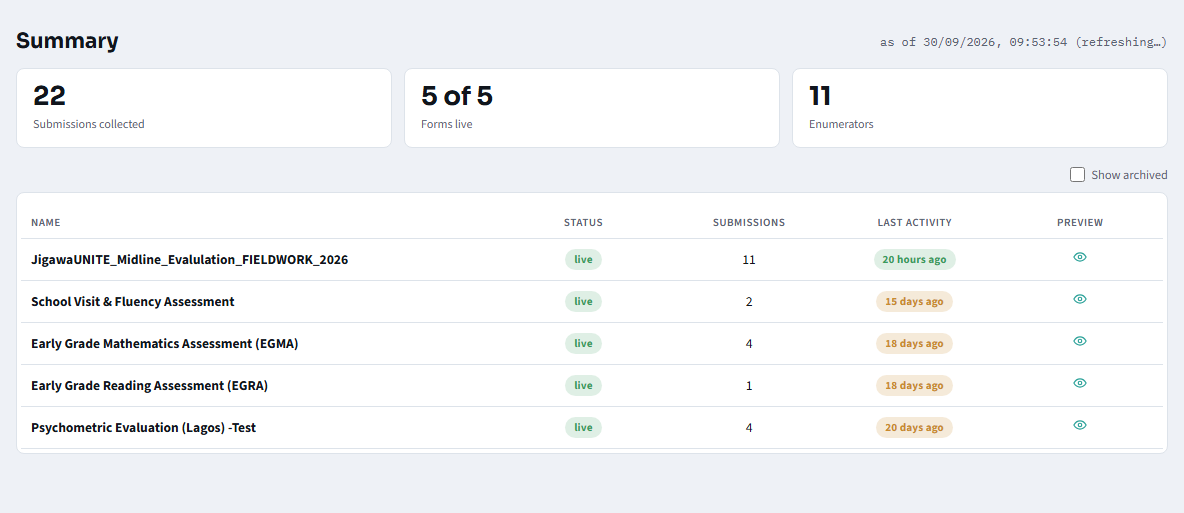
- The three number tiles show submissions collected, how many forms are live, and how many distinct enumerators have submitted data, across every form combined.
- The table below lists every form with its own status, submission count, and last activity — click a form's name to open its own dashboard, or tap the eye icon in the Preview column to test that form directly (section 12 covers what Preview does).
Clicking a form's name drills into that form specifically: its own submission count, how recently data last arrived, how many enumerators have contributed, and how many distinct schools have been visited, plus a breakdown of submissions by school and by enumerator.
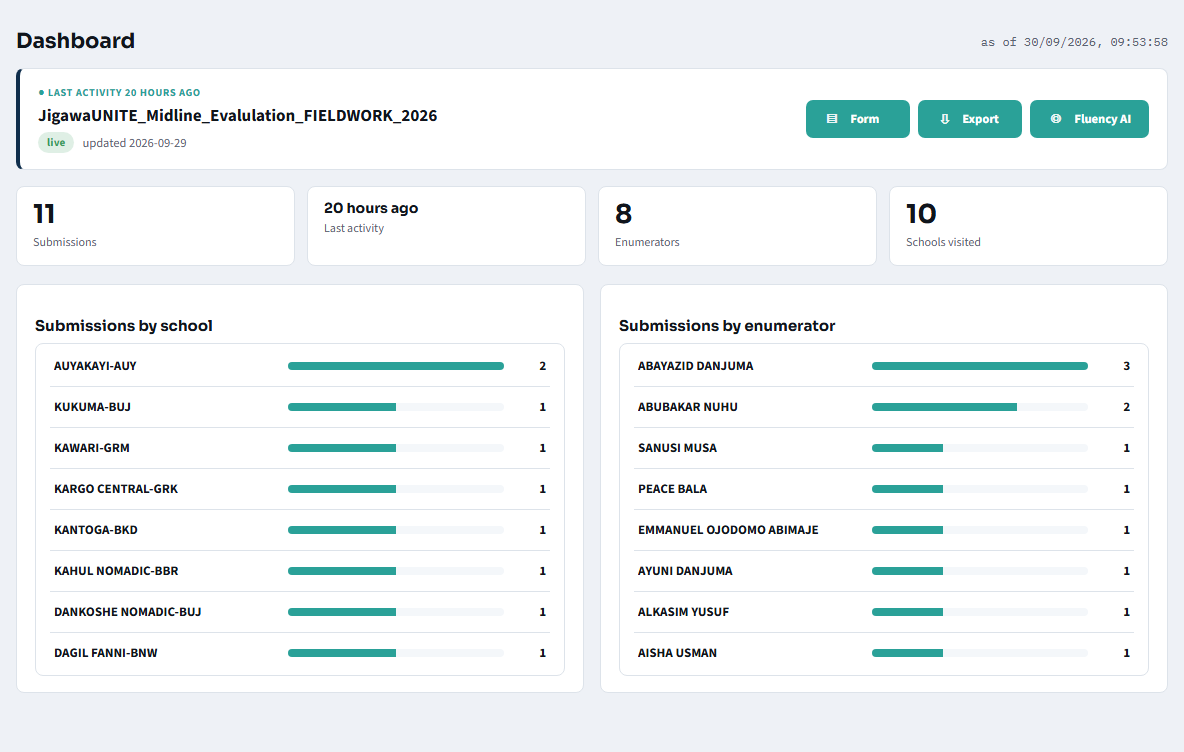
12. Form
Opens scoped to one form at a time — reached from Project (section 11) by picking a form and tapping its Form button. A “Showing <form> only” banner at the top confirms which one, with a link back to Project. This is where that form's own toolbar of actions lives, along with its questions, roster, and other settings below. Adding a brand-new form works the same way, via + New form in the sidebar.
The form's toolbar
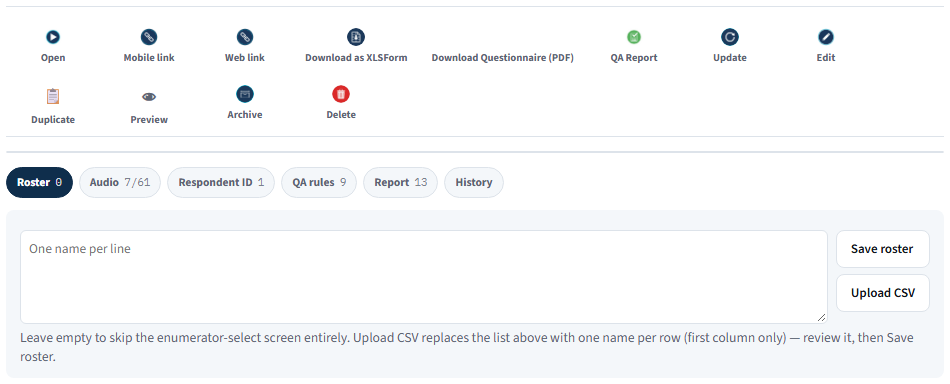
| Button | What it does |
|---|---|
| Open | Opens this form's real, submission-writing experience directly, styled for a desktop screen — a quick way to see or try it without a phone. |
| Mobile link | Copies the plain link real enumerators use on a phone. |
| Web link | Copies a desktop-styled link for filling this form from a computer — handy for office-based data entry or backfilling. Same real submissions as the mobile link, just styled for a larger screen. |
| Download Excel / Download as XLSForm | Downloads the form's underlying spreadsheet — the original uploaded file, or (for a form built/edited in the visual builder) an always-up-to-date spreadsheet generated from its current questions. |
| Questionnaire (PDF) | A formatted, printable version of every question — handy as a paper reference or for review by someone without admin access. |
| QA Report | A data-quality report: duplicate respondents, submission-timing outliers, per-enumerator daily counts, fluency-vs-time flags, plus any form-specific rules set in the QA rules tab below. |
| Update | Re-uploads a revised XLSForm spreadsheet to replace this form's questions — the spreadsheet route to changing a form, as an alternative to Edit's visual builder. Every Update is snapshotted first, recoverable from the History tab below. |
| Edit | Opens the visual form builder — covered in its own section just below. |
| Duplicate | Creates a completely independent copy of this form — same questions, roster, audio/respondent-ID/QA/report settings, and preload datasets — that you can then edit freely without touching the original or any of its collected data. Handy for reusing a form as a starting point for a new round or a similar assessment. |
| Preview | Opens a real, working copy of the form to test — nothing entered here is ever saved or counted anywhere (not the Dashboard, Export, or Fluency AI). Available for every form, whether or not it has a pending draft; labelled “Preview draft” specifically when there's an unpublished change to test. |
| Deploy / Discard draft | Appear only once Edit or Update has left a pending, not-yet-live change. Deploy makes it the live version every enumerator sees immediately; Discard draft throws the pending change away and keeps today's live version untouched. |
| Archive / Unarchive | Hides a form from the main list without touching its configuration or any collected data — for forms you're done with for now but don't want to delete. Unarchive brings it straight back. |
| Delete | Permanently removes the form and every submission ever collected for it. There is no undo — archive instead if there's any chance you'll need it again. |
The online form builder
Tapping Edit on an expanded form card opens the form builder — a visual, no-code way to build and change a Lens form directly in the browser, with no separate spreadsheet or file to manage. The left panel lists every question in order; the right panel is the inspector for whichever question is selected, where its text, type, and logic are edited.
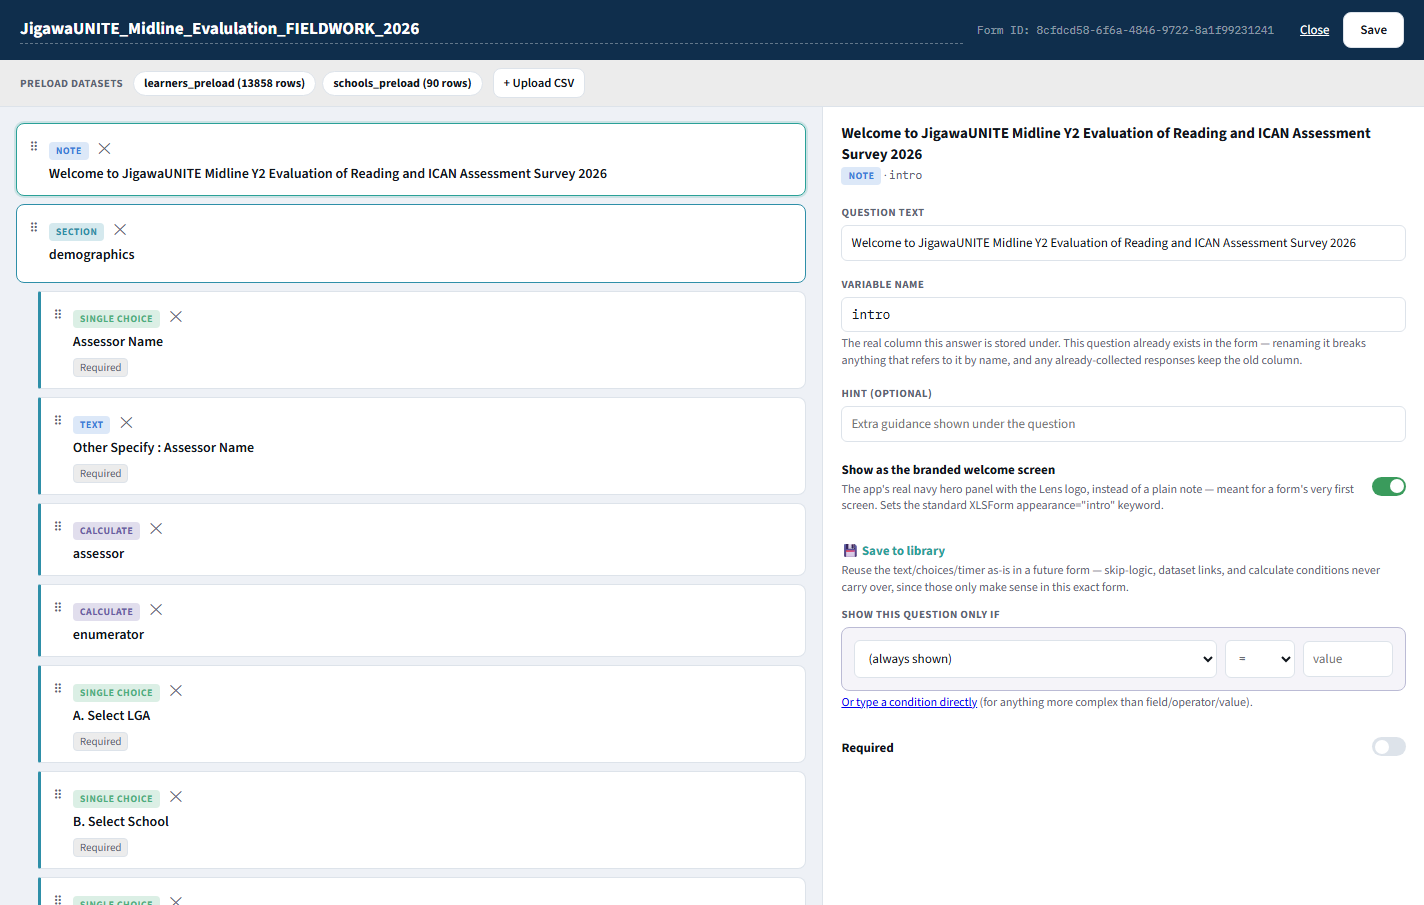
- Question types cover everything a Lens form can ask — single/multiple choice, text, numbers, dates, sections, calculated values, and the special timed reading/numeracy mechanics used in assessments like JigawaUNITE.
- Skip logic (“Show this question only if…”) controls which questions appear based on earlier answers, without writing code.
- Preload datasets (top of the screen) are the CSV files a form's dropdowns pull real options from — school lists, learner rosters, and similar reference data uploaded once and reused across many questions.
- Changes are edited as a draft first, previewed, and then explicitly deployed to go live — a live form already collecting real data is never changed out from under enumerators mid-edit.
The six configuration tabs
Below the toolbar, six tabs hold settings for this specific form. Each has its own Save button — changes only take effect once saved.

| Tab | What it's for |
|---|---|
| Roster | One name per line — the list an enumerator picks from on the “Who is collecting this response” step. Leave it empty to skip that step entirely for this form. |
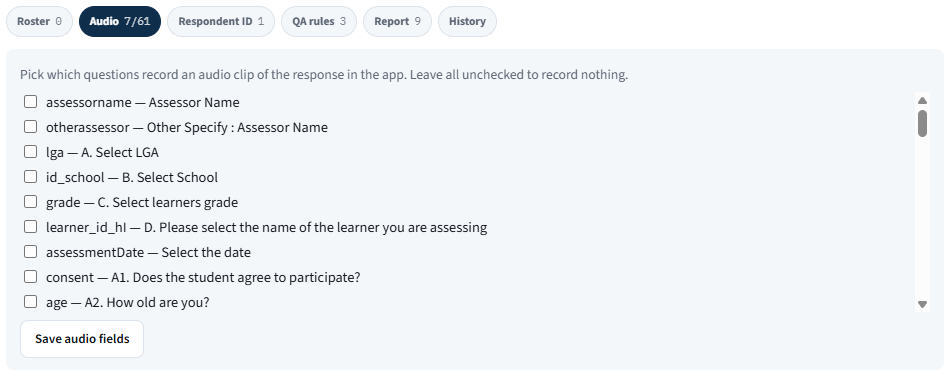
| Audio | Tick which questions record an audio clip of the response in the app. Leave everything unchecked to record nothing. |
| Respondent ID | Tick which answered questions (e.g. school, learner ID) get joined into each audio clip's filename, so a recording can be identified without opening the CSV. This only affects file naming, never what's recorded. |
| QA rules | Every form is already checked automatically for duplicate respondents, timing outliers, per-enumerator daily counts, and fluency-vs-time flags. Add form-specific rules here on top — e.g. flag rows where consent is missing, or a reading passage's own score is out of range. |
| Report | Pick which questions appear in this form's aggregate PDF Report (the “View/Download PDF” option on the Export tab) — a searchable checklist of every real column, including ones from repeat sections. |
| History | Every Update re-upload snapshots the form's previous title, questions, and original file here first, so nothing is ever silently lost — restore an earlier version if a re-upload turns out wrong. |
As an example, here's the Audio tab open on JigawaUNITE, with a handful of questions already ticked to record:
13. Export
Reached the same way as Form (section 12) — pick a form from Project, then tap its Export button. Where collected data leaves Lens and becomes a file you can analyse — in Excel, Stata, or anywhere else.
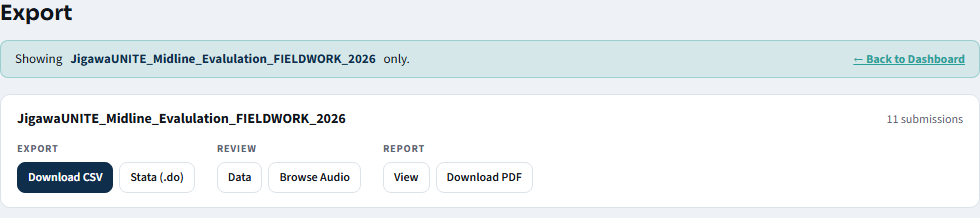
| Button | What it does |
|---|---|
| Download CSV | Every submission as a spreadsheet, one row per response. |
| Stata (.do) | A companion file that imports the CSV into Stata with variable/value labels applied. |
| Data / Browse Audio | An in-browser table of every submission, and (where audio was recorded) a way to listen back to clips. Browse Audio has its own search box to jump straight to a clip by pupil name or submission UUID. |
| View / Download PDF | A formatted report summarising the form's key figures. |
14. Fluency AI
Reached the same way as Form and Export — pick a form from Project, then tap its Fluency AI button (a form with no audio-recorded reading questions won't show this button at all). An experimental feature for reading-passage forms like JigawaUNITE. Every time an enumerator records a pupil reading a timed passage, Lens sends that same recording to an AI speech-recognition model in the background, producing its own independent reading score — shown here next to the enumerator's own live-recorded score, for comparison.
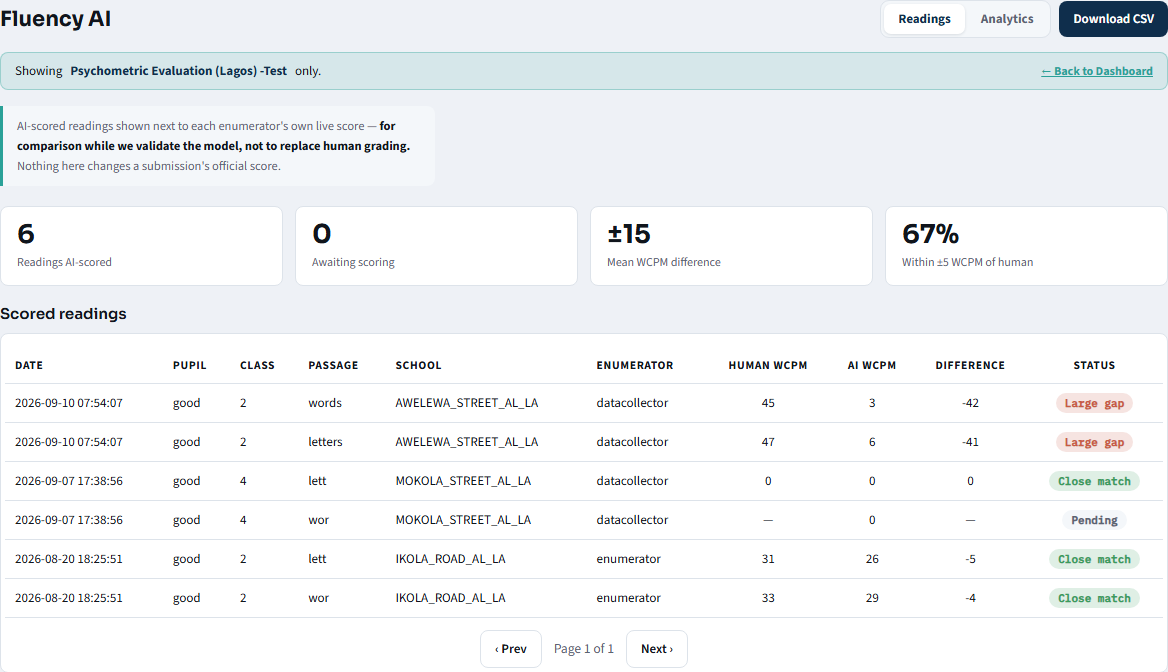
- Pupil, Class, and Passage identify exactly which child and which reading a row belongs to — each pupil normally appears twice, once for the shared baseline passage and once for their own grade-level passage.
- Human WCPM and AI WCPM are measured in the same units (correct words per minute) so they compare directly.
- Difference and Status flag agreement — Close match, Review, or Large gap — so you can spot readings worth a second look.
- Download CSV exports the whole comparison table, including the AI's own transcript, for offline analysis.
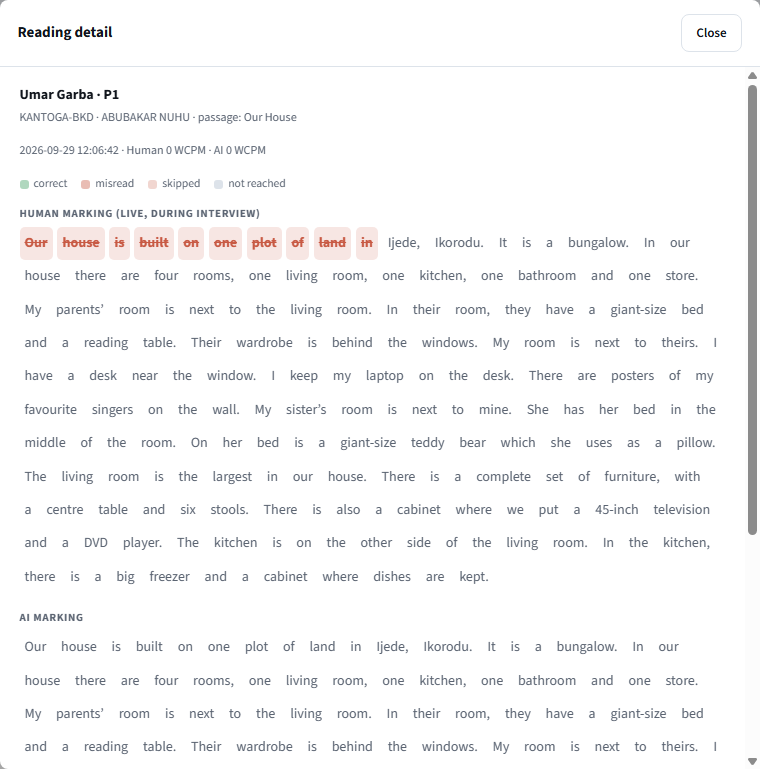
Tapping any row opens a word-by-word comparison in a pop-up window: the same passage marked twice — once as the enumerator marked it live, once as the AI's transcript matched against it. Close it with its own Close button once you're done.
The Analytics view
An Analytics toggle next to Readings switches from one-reading-at-a-time to an aggregate view: an overall summary of how often the AI and the human agree, then two ranked breakdowns.
- By passage — sorted by how many readings have been scored, so you can see whether a specific reading passage is unusually hard for the AI to follow.
- By enumerator — sorted by average gap, largest first, meant as a starting point for a supervisor to pull up a real reading and listen, not a verdict on its own. A high gap is just as often the AI struggling with audio quality or background noise as anything about how the enumerator scored.
Passages or enumerators with fewer than 2 scored readings are grouped into an "other" row rather than shown individually — too little data yet to mean anything on its own.
15. Manage access
Controls who can use Lens, and what each person or device can see — three separate kinds of access.
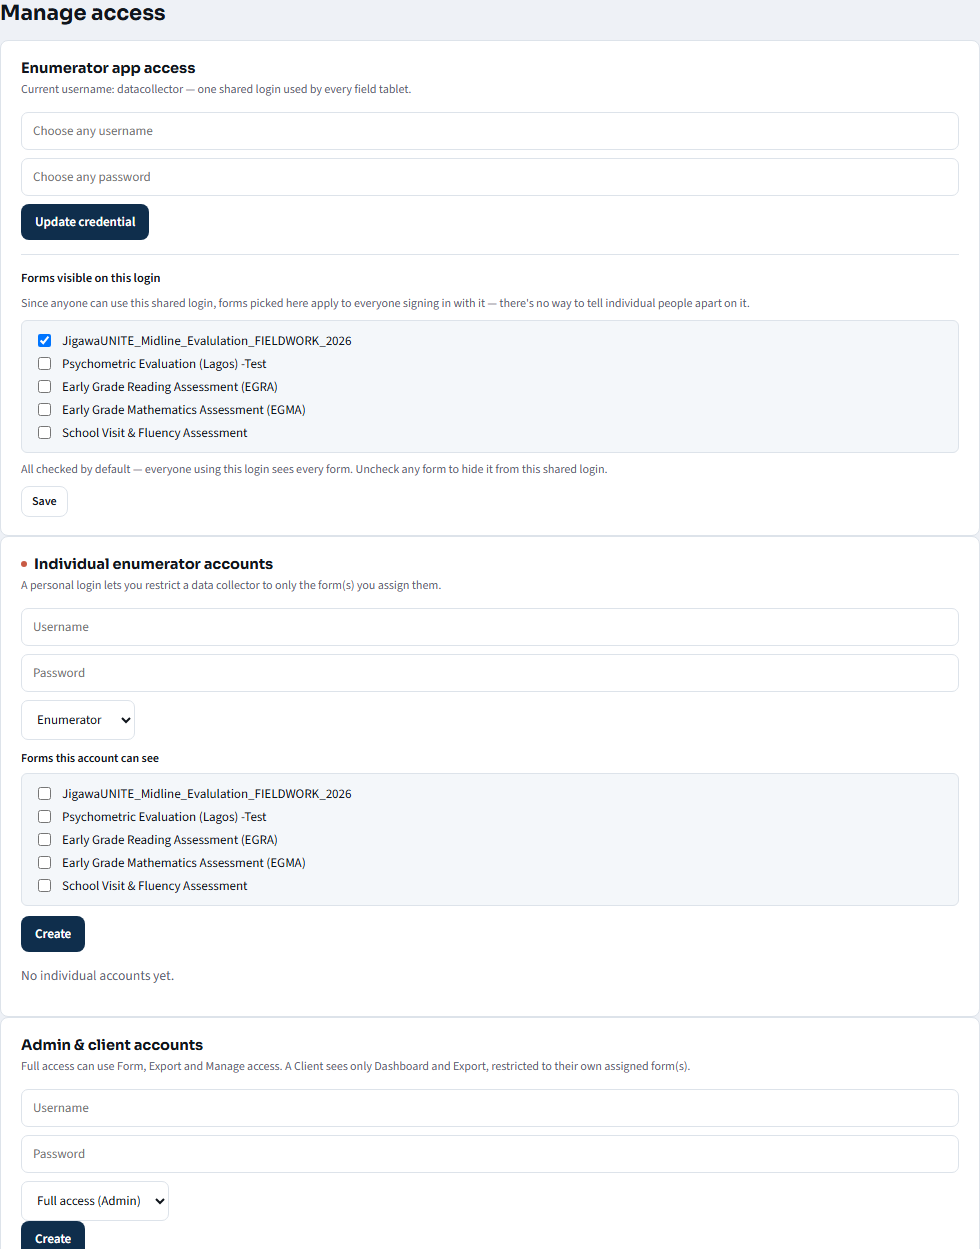
- Enumerator app access — the single shared username/password most field devices sign in with. By default it sees every form; individual forms can be unchecked to hide them from this shared login.
- Individual enumerator accounts — a personal login for one data collector, letting you restrict that person to only the form(s) you assign.
- Admin / Client accounts — other administrators, or outside clients given a restricted, read-only Dashboard limited to their own project's form.
Appendix — Frequently asked questions
Q: What happens if I lose internet connection partway through an interview?
Nothing changes about how you work — keep answering normally. Everything saves to the device as you go, and the finished response moves to Ready to Send until a connection is available.
Q: What if I accidentally tap the wrong word during a reading passage?
Tap the same word again to un-mark it — this works at any point before you tap Finish.
Q: Can I redo a reading passage if the first attempt went wrong?
Once a passage is finished, that attempt is what gets recorded. If a genuine mistake happened, use Save & Exit and speak to your supervisor about the correct process for your project, since this can vary by evaluation.
Q: Why does the pupil's name sometimes not appear in the learner list?
The list is pre-loaded from the school's official roster ahead of time. If a pupil is missing, double-check the correct School and Grade were selected earlier — the list is filtered by both.
Q: Does Fluency AI change a pupil's official reading score?
No. It's shown purely for comparison. The enumerator's own live-recorded score is what always counts as the official result.
Q: Who can access the admin console?
Only accounts created by an existing administrator, from Manage access. Field enumerators do not need — and are not given — admin console access.
Q: Can I test a form without affecting real data?
Yes — every form's Preview button (Form tab, section 12) opens a fully working copy that never saves or counts anything, on the Dashboard, in Export, or in Fluency AI. Use it as freely as you like.
Q: What's the difference between a form's Mobile link and Web link?
Mobile link is the plain link real enumerators use on a phone. Web link opens the same form styled for a desktop screen — handy for office-based data entry — and still writes real submissions, exactly like any other response.
Q: Is there an APK to download for the enumerator app?
Yes, for Android — see section 1 for the download link and install steps. iPhone/iPad has no APK support; use the browser address directly instead (also covered in section 1).
Lens is under continuous development. If something in the field doesn't match this manual, please let your project's technical contact know so both the app and this guide can be improved.